Table of Contents
INTRODUCTION
Adobe Photoshop 2021 has a variety of additional features for creative professionals. With its new release, Adobe features over 160 improvements over its predecessor. Photoshop 2021 has six key themes: better productivity, layout, the new compositing tool, remote editing, file encryption, and security. The interface has been simplified to make it easier to create better compositions and offers a color palette adjustment tool that helps colorize individual pixels to achieve more accurate skin tones. This book will give you details on some additional features like The Content-Aware Fill tool, which has been improved so that it can be used to “find missing portions of objects that make up a finished picture.” At the end of this book, users of Adobe Photoshop 2021 will be able to create their first design, use the magic wand tool and so much more, and likewise understand the new update better.
CHAPTER 1
Downloading and Keeping Adobe Photoshop Updated

Step 1: Open the Microsoft Office Download Center, search for Adobe Photoshop, and download the product directly to your computer.
Step 2: Launch the product and the installer will automatically start. Make sure that you follow and don’t miss any steps. After installation, select Advanced Mode.
Step 3: As soon as you enable installation on a USB stick, the installer will update Adobe Photoshop with the latest features.
Learning About Adobe Bridge and Installation

Adobe Bridge is a front-end design tool from Adobe that allows you to design and manage website content with ease. It has been one of the most widely used and supported software frameworks for website building by developers and designers over the past decade.
The bridge is a stripped-down version of Flash and CSS. These are used for every kind of website building.
Since it is a stripped-down version of Flash, you can easily work with any kind of software, without knowledge of the language they are written in. There are a lot of customization options available for various parts of the software. Besides, it is available for both Mac and PC users, hence you don’t have to download it from the Adobe website.
You only need to fire up your browser and go to Adobe Bridge website, download it and install it in a browser window, and you are ready to go.
Using Adobe Bridge to Download Photos
Before we begin, let us remember that you need to download this essential software for free from the website of Adobe. Once you download, install it on your computer. Now it is time to get started.
This is the most important step, so you must follow this procedure properly. First, you must search for the images you want to download.
First, open Adobe Bridge and search for the images you want to download. Click on the library that you want to download and select the images. Once you have downloaded your photos, you can download a high-quality digital image from Adobe.
Now, when you have downloaded them, you must import them.
To do this, follow these steps:
Take a picture on your computer and use Photoshop.
Select the image and click the “Import from File.”
You will get an option to open the file in Adobe Bridge. Click on the “Open In” button.
Keep in mind that you need to use this option for a while.
Now, you can proceed to download the images.
How To Use Adobe Bridge for Managing and Organizing Photos?
Using Adobe Bridge to organize and manage photos is quite easy. Open Adobe Bridge and then navigate to Photos (the image folder on your computer)
If you want to manage and organize photos and videos, open Photos again. From the ‘My Photos icon,’ click on the ‘Add’ tab.
To sort photos by name and date, click in a box and give it a name
For each row in the Photos list, click in each cell and give it a date and a title (date 1 for each cell)
Add tags to the photos
Click in a cell in the Photos List and the Tags column, click on the blue arrow
You can edit the dates by clicking on them
To search for photos, use either the Search icon or Search filter to find photos by a certain name, a specific location, date, or date ranges.
To delete photos and videos, click Delete
To access the Photos folder on your computer, right-click on the Photos folder on your computer. Click on ‘Properties’ in the corner and then click on ‘Advanced.’
Click on the Folder tab and select Folder. Click on the Add button.
The first thing you want to do is name your folder and add files to it. Click
OK
How To Change Your Adobe Photoshop Color Setting
Step 1. Right-click in the color menu bar on the color picker menu Step 2. Choose a whole different color, you want a green hue?
Step 3. Click on the ‘History’ button
Step 4. You are now editing the color
Step 5. You should now have a nice selection of color choices.
Step 6. Add any color you want!
You will have to do this multiple times until you find the right color choice for your photo.
Using Creative Cloud
Creative Cloud is also referred to as the online service where you can edit your photos using the familiar Photoshop tools without even entering the actual Photoshop interface. You can edit images on your device or tablet, then save your edited photos on cloud storage. After that, you can load those edited photos onto the desired machine of yours to edit the same further. It is useful because you won’t be facing the hardware hassle of loading and then burning the images to CDs.
How to import RAW photos on Creative Cloud?
To import images to the Creative Cloud, you need to be a member of the Adobe Photoshop CC program and on Mac. There is also an option that you can convert all the RAW files to jpg. However, you don’t need to convert all RAW files to JPGs and a few RAW files can be converted to JPGs directly using a simple process.
How To Customize Your Photoshop Interface Through Preference

Now, you can customize your interface and your favorite tool by user preference. You can play around with these nifty icons on Photoshop using this section in the Photoshop user interface. By default, the menu has an icon for a document and it’s where you navigate to. However, if you want to add more options for the application and have a better experience with it, then it’s as simple as going to the Photoshop menu > Preferences.
This will open a section called Preferences.
There, you will find a complete list of options.
Now, let’s see what the default options are and how to change them. You can also add your option by clicking on the + icon. You can check the dropdown list to find more options.
Talking about the Customize button, click on the Customize button and you will be presented with a list of options. Now, select the section you want to change, and let’s look at the different sections you can change here.
Window
Ctrl + D, Options
Ctrl + I, Options + Zoom
Ctrl + K, Window Widget
Ctrl + N, Window Menu
Ctrl + A, Project Tools
Ctrl + C, Advanced Shape Editing
Ctrl + A, Appearance
Ctrl + T, Change of window size
Ctrl + M, Make all windows 100% full screen
Ctrl + I, Interface
Ctrl + F, Find in Projects
Ctrl + U, Window Filters
Ctrl + P, Project menu
Ctrl + I, Palette
Ctrl + N, Stylus
Ctrl + A, Paste in Selection
Alt + F3, Default Project settings
For the Customize button, you can either edit the feature for which you are tweaking or click on the Add button and select the item from the list. You can also check the boxes if you don’t have an option in mind.
CHAPTER 2
How to Change Image Sizes

One of the common problems with Photoshop is the size of images. If you create a new layer with an enormous image, you can always change the size. However, it’s difficult to resize the big image layer.
Photoshop enables you to resize your image layer. So, if you want to change the size of the image, then you can select the image layer on the layer panel, go to the edit options and you’re good to go!
You can use the following commands:
STEP 1
Select the image layer on the layer panel and go to the Edit menu. Once you are in the Edit menu, you need to edit your image size. A new dialog will pop-up with various image sizes, and you need to select the correct one by clicking the appropriate size.
STEP 2
Select Image Size > New Size, you may get a “Saving and applying changes” message, but don’t worry! You can continue to work on the image. When you click on the New Size button, then all the image sizes will change. So, you can take the size you want and save it to the documents folder or drag it to the Clipboard.
If you do it correctly, it will save your work. But if you want to keep the one you are working on, you can set the mode of the “Save” button to either save as default image size or you can save it as “image size.”
If you are working on a big image, you can set the mode of the “Save” button to a large size and it will be the size of your image.
To remove the size of the image, click on the New Size button and select the smaller one.
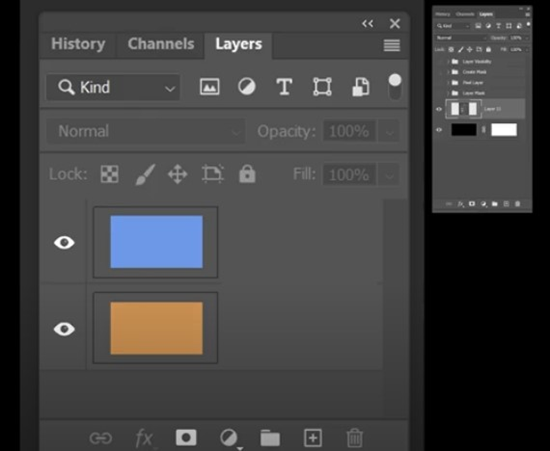
Layers And How to Work With Them
Adobe Photoshop 2021 has two layers for manipulation: a colored layer and a transparent layer. Also, the Batch Format (e.g., Save as Layer, Paint on Layer, etc.) can be done with both layers.
One way is to select the one you want, and right-click (or Control-click) on the layer to bring up a context menu.
You can also bring up the context menu by double-clicking the layer or right-clicking (or Control-click) on the layer’s thumbnail.
Adobe Photoshop 2021 uses contextual menus on the layer to pick your preference. A layer is one of Adobe Photoshop’s tools, and it’s a tool that you can use on any layer that you’re on, to manipulate the content on the layer, modify it, or create a new one.
Adobe Photoshop 2021 layers are called “Layer,” and some of them might be named different things, such as “Alpha Layer,” or “Layer 1,” or “Layer 2” — or more — but the names of the layers are:
Layer — One of the tools of Adobe Photoshop 19 Professional and Adobe Photoshop 2010 feature. All layers have the same name, if the layer’s content is displayed on all layers, such as a pattern, a style, a text, etc.
Trace — A tool that you use to draw onto the layer. It creates a mask on the layer’s content.
Matrix — A tool that takes information from one layer and stores it into another layer. For example, if you draw a large text on a layer, and then try to paste it into another layer that doesn’t have the text, the selection won’t work. The text will be copied, but the actual text will be on the new layer, not the original layer.
Batch Format — A tool that enables you to create a batch of multiple layers, or you can save a batch as a single layer, or even in different formats, such as a single file that you can save or share with others. You can also create your custom batch format if you want.
Alpha Filter — An adjustment that allows you to fade through a layer’s contents. For example, you can remove content by masking it, making it transparent, or changing its opacity.
Matrix Filter — A tool that allows you to convert a selection of pixels (or pixels in any format) to a pattern. It’s useful for creating symmetrical patterns.
Crop Filter — A tool that allows you to remove a part of a selected image and add it to another part. You can also make a separate copy and save it.
Flip — A tool that lets you rotate an image (or part of it) and flip it in the direction you want.
Flip the Layers — A tool that makes multiple copies of a layer.
Duplicate — A tool that you can use to duplicate the selected layer.
Repeater — A tool that lets you repeat the process (used to create a new copy). It allows you to repeat the process 5, 10, or 20 times.
Drawing — A tool that lets you make straight lines or arrows. It’s useful for creating composition images.
Selector — A tool that allows you to select multiple layers in the same document and move or delete them.
Gravity — A tool that lets you manually create and automatically duplicate a drawing element. It’s useful for creating a balloon in Photoshop.
Color Switch — A tool that allows you to select the primary color for a color swatch. It’s useful for creating mask graphics, such as a figure.
Render — A tool that makes a copy of the layer and lets you adjust it.
Saver — A tool that lets you save multiple layers.
Spray — A tool that lets you create a graphic in which layers can be decorated with paint, pencils, or other objects. You can also draw patterns on them.
Filter — A tool that lets you filter your content.
Color Adjustment — A tool that allows you to adjust the opacity of the color layer.
Cross Process — A tool that allows you to use multiple layers in one document.
Encoder — A tool that enables you to save multiple files into one file. It works with pictures.
Error Code — A tool that lets you see what went wrong in a document before you try to save it.
Expose — A tool that lets you view the entire contents of a document onscreen.
How To Adjust the Quality Of An Image?

One of the best tips to get professional quality images from Photoshop is to adjust the saturation, contrast, and sharpness of your images. It’s not a complex process, but it can help you to bring an extra punch to your photos. A better image will make you more approachable and your marketing efforts more effective.
However, if you want to know exactly how to get this effect, you should read this to know how to adjust the quality of an image on Adobe Photoshop.
Step 1. After you have imported a JPEG photo into Photoshop, press CMD+Alt+Z (or use “Start | Adjust Size”)
Step 2. At the top right corner of your Photoshop window, you will see three buttons:
- Control Center
- Top Row
- Bottom Row
In the lower right of the top row, you will find “Properties.” Go ahead and open “Sharpness.”
Step 3. After you have opened “Sharpness,” you will see some sliders:
Altitudes
Limitations
Key
Adjust the Altitudes
Save image quality
Step 4. The next step is to adjust the Limitations and Key. Both options are similar in terms of adjustments, but when you use “Altitudes,” you are talking about controlling the luminosity of your image and adjusting the exposure balance of the image. You can’t use “Limitations,” as it will remove the white balance. So, you have two options here:
Make your image more vibrant
Make your image more cinematic Choose the appropriate option!
Step 5. You can check your work with the “Preview” tool. Right-click the image on the left and choose “Preview with/without the White Balance.” Press “OK” and you will get this result:
Step 6. Like “Sharpness,” “Limitations” can be adjusted for white balance, exposure, and saturation levels. So, check your work with the “Preview with/without the White Balance” option. Click “OK” to preview the image.
Step 7. We have one last adjustment to go through: “Color.” Here, you can adjust the levels of all the colors of your image, which will affect the overall balance.
For example, if you have bright red in your image, you might want to reduce the level of that color. If you want to have a little blue or magenta, you can increase it a little.
Select the correct one:
Select all:
Go to Filter > Layer Style.
In the “Controls” box, click on the green “Filter” button.
In the “Ambient Occlusion” box, click the blue “Change” button.
In the “Change Red” box, click the green “Change” button.
In the “Change Blue” box, click the blue “Change” button.
Make it perfect!
Now make your image shine! Put your tweaks to good use. You’ll start with making the background of the image brighter and the main subject of the image more attractive.
Step 1. Add identity to your photo:
Step 2. Change the image color slightly:
Step 3. Change the text color:
Step 4. Change the background:
Step 5. Change the background by making it brighter, and this is perfect for Instagram!
Step 6. Change the crop and other settings to your liking.
Step 7. Your masterpiece has finally been created! You’ve got the best tools for any photo you’d like to create!
CHAPTER 3
How to Retouch An Image

Retouching with Photoshop is not an easy task. You need an expert knowledge of the tool and, know how to use it on high-resolution images. Here are simple steps to retouch an image in Adobe Photoshop 2021. You can use these techniques to remove blemishes, sharpen the image, and much more.
Step-by-Step
- Look at the Photo of the Model you wish to retouch.
- Edit Details – Delete unneeded unwanted details like hair clipping, extraneous hairs, etc.
- Select Image Mode – Remember that you should only select an image mode that is optimized for your device.
- Optimize – Optimize the image by reducing the noise, removing the starbursts and other unwanted artifacts.
- Use Objectives – Look for the focus points of your retouch and identify them. Adjust the Blur radius and apply corrections accordingly.
- Adjust blending modes – You can control the blending modes using the blending modes. The levels and the opacity options can be used to modify the blend modes as per your need.
- Adjust curve adjustments – Adjust the levels and the opacity as per your requirement. You can also change the focus point of your retouch.
- If you are working with a digital photo, use the adjustments through the layer mask instead of adjusting the color and blend modes individually.
- Preview – As the layers are created on layers, you can change the background color and its opacity by using the layer mask, or also, you can view the image as a preview by hovering the cursor over the top of the layer mask.
- Apply filters – In Adobe Photoshop, there are several filters to offer you an effective retouching experience. You can use these filters to change the color of the background or change the aspect ratio of the photo.
Adding Your Preferred Text and Shape

Select the top navigation, and then choose View-> Pattern Editor-> Pattern Filters and tools. Now, select Text. Under “Text type,” make sure you choose Copy & Paste, not File and Save.
After saving, all you must do now is create a shape using the Text Palette and apply the pattern. Select the body’s outline with your brush and move your mouse cursor over the area you want to blend with the shape. You can do this all in the Editor.
Now, click on the small icon to the right of the Shape brush and select “Copy” from the options. This will copy the texture to your clipboard. In the Toolbox, make sure your selection is selected by using the Options Tool, and then you can paste it to your shape’s pattern and your pattern is done.
Go back to the Pattern Editor and in the Pattern, Editor Tools tab, click on “Sculpt Tool.” Use the Masking Tool (Ctrl+Alt+M) to mask over the area you want to blend. You can also change the blend mode from Low to High.
Combining Images, How to Do It

Photoshop allows you to combine images effortlessly. You can crop, save, and move any part of the image but you can also combine two images by clicking on the Adjust Hue/Saturation/Lighten and then clicking on Add Layers, and finally click on Go!
Please be patient. It takes some time to achieve a result like an actual blend.
- Open two images in separate windows
- Go to Layer > New Layer > Fill and Control
- Choose From Inside
- Choose Photoshop Image
- Choose Photoshop Blend from the drop-down menu
- Fill the layers with image
- Right-click on the layer and click on ‘Create New Copy.’ Copy the newly created copy to your Pictures folder
- Rename the newly created copy as your_new_copy.psd9. Repeat the same process with the second image for the second image
- Open the second image in separate windows.
- Go to Layer > New Layer > Blend.
- Choose Photoshop Image from the drop-down menu
- Fill the layer with an image
- Use the ‘Create New Copy’ option for the second image
- Rename the newly created copy as your_new_copy.psd
How To Apply Filters
Adobe Photoshop is an absolute favorite amongst graphic designers and other professionals for its non-destructive editing capabilities. However, one thing that makes it somewhat tricky for users to work with is the lack of an extensive filter interface.
Filters are pre-defined artistic choices in Photoshop to style your images. From blending to clipping and more, the filter feature in Photoshop is going to give you some challenging and interesting creative possibilities for you to experiment with.
To make matters more interesting, Adobe has launched Photoshop Brushes (aka as Brush Packs) that let you select from preset tools to customize your effects. When you browse through all the available brushes available in Photoshop, you can also look at how they can be applied to a photo.
Step 1: To use a brush, press Ctrl+Shift+B (Windows) or Cmd+Shift+B (MacOS)
Step 2: In the top right corner, press the edit button (top right arrow icon)
Step 3: Select the Brush Settings tab and then hit Ok
Step 4: Now, you have the access to a multitude of preset brushes, which are a collection of possible adjustments that you can make to an image to alter the picture in a particular way. To browse through the available brushes, select the area that you want to alter and then press Ctrl+A.
CHAPTER 4
How to Edit Your First Photo Project
Create a new document in Adobe Photoshop but keep it in a “from folder” Open the image you created in your working folder (Photo-work).
Look at your new file and do a quick review. Do not edit your first photo project with Photoshop if you do not know what you are doing. Look at the image and if you can see any areas of over-sharpening, try to hide it. If you are sure, it’s the only area where it is visible, you can go ahead and do a sharpening adjustment.
It’s also a good idea to create a new layer and then go to “Text” and make your first edit. It’s easier to learn a new program if you start at the beginning.
A new layer
Go to the new layer and drag the text layer to the top. There is a delete button for each layer in Photoshop, so you don’t have to use the “source button” as it is normally used.
You can use the “Filter > Adjustments > Other” dialog to see what other options you can use to improve the image. There are many useful filters, such as Curves, Height, Width, Contrast, Noise, Blur.
In this case, you can decide to remove the “Over-sharpening” effect, as it’s a relatively minor issue.
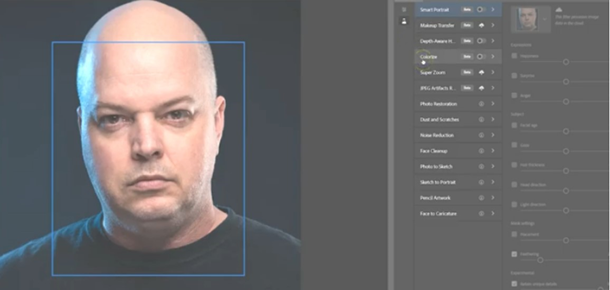
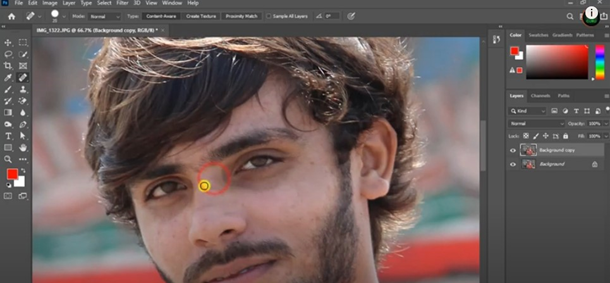
Make a minor adjustment to your subject’s face
Use the “Eye” layer to fix a minor issue with the eyes of the subject (in the picture). We would like to make the subject look calm and happy.
You can do this by clicking on the eye next to the subject.
Then you can go to the face layer and make the same kind of adjustment to fix it.
Hide a part of the image
Go to the layer “Text” and then to “Hide”. After some clicking, you can find a little hole in your image. It is a layer mask, so you can adjust it to hide some areas.
The “Text” layer is hidden
You can then adjust the opacity of the mask.
Adjust the photo
Go to the “Blur” layer and, with the yellow slider, increase the blur effect.
You can adjust the size of the blur until you like the result. The default size is 3, and I usually increase it to 5 (in this case) in my photo editing work.
Adjust the lighting
Go to the “Over-brightening” and “Over-darkening” layers and adjust the levels to the desired effect. The shadow levels should be smaller, as it adds a little more punch to the image.
How To Zoom and Pan Photos
On Photoshop (Windows/macOS) and the mobile app Adobe Camera Raw, users can zoom and pan photos by pressing the F2 (Menu/Text-Input) or F12 (View) key. Here’s how you can do it:
Turn off the zoom and panning features
The first thing you must do is to turn off the zoom and panning features for all images in your project. By default, all images in the project can be zoomed and panned.
On Windows:
To zoom and pan any image, select it and click the appropriate tool to zoom and pan. To choose the tool, tap it (typically, a crosshair appears).
You must remove any zoom and pan buttons from the corners and edges of the image.
Press the appropriate button to zoom or pan all the way out to the corners or edges of the image. The window will flip over.
To un-maximize and pan back, drag the edges of the window until it snaps back to the corner. On the mobile app:
The way to zoom and pan images in Adobe Camera Raw is like Photoshop.
To zoom and pan any image, select it and press the M key to change the magnification. After this, press the M1 key to change the scale.
Make sure to set the corner focus for the corners. This setting is not available in the default settings of the application, and it must be added by manually selecting the corners with the mouse.
And that’s all there is to it! You can now zoom and pan all the way out to the corners of your image. Now that you know how to zoom and pan your photos, you can quickly change the composition of the photo.
Creating Your First Design
Pick a Color Scheme
Choosing a color scheme for your layout is the most important step of this process. You don’t want the color scheme to clash with your photos or other design elements, but it should be prominent enough to give your layout a cohesive look. Below are some color schemes for layouts that feature circles:
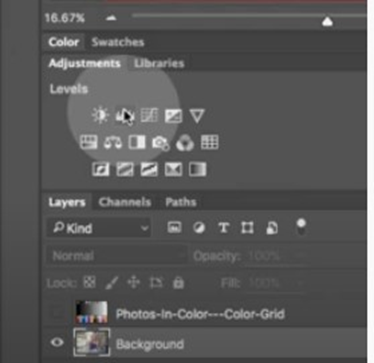
Pick a Grid and Pick a Pattern
The grid of your layout will dictate the spacing of your elements. The color of the grid will dictate the color palette for your circle designs.
Hang Around Design Forums
If you don’t have any suggestions for circles, then look to the next step: talking to other designers. I have never been much of a designer, but I keep a close eye on online communities such as Behance and Dribbble.
The most helpful places to start are the Design forums on Dribbble and Behance. While there will be people asking for designer advice you will also have the chance to read ideas and the methodologies of other designers.
Using The Undo and Redo Command
Before you start undoing something in Photoshop, you need to know about the steps you need to follow.
Let’s say the error that you are about to undo is at the bottom of the image, your tool should be positioned at the top right corner of the image (where the error is).
STEP 1: Hold the Command / Option key as you start to move your mouse in the right direction.
STEP 2: Click on the Reverse button to end the editing.
STEP 3: And finally, you should end the ‘undo/redo’ action.
CHAPTER 5
Using Levels to Improve Photo Contrast And Brightness
Levels can dramatically reduce noise in any photo. Most people use Levels at least occasionally yet are not aware of it.
Before, the level was a distinct asset of a photography professional who understands the angles of the image very well. Now, we can use levels to improve our photos in seconds with no additional training. Levels can dramatically reduce noise in any photo.
Levels are comprised of grid lines drawn on the image in four quadrants. Within each quadrant, a combination of transparency and color levels is set to bring the brightness, saturation, and sharpness of the image to a perfect level.
These values are customized based on the photo being improved, which makes it simple to find the optimal values.
How to use levels to improve photo contrast
You can always use Levels to change the levels of color and transparency of a photo with a couple of clicks. To start, select the photo, open Photoshop, and draw lines between the individual color levels. To modify the transparency of the image, press on the “+” and choose “Grayscale.” Next, reduce the level of transparency to a few percent.
How to use levels to improve photo brightness
Select the image in your working space and start tweaking the brightness. Then, change the levels of both color and transparency with Levels.
Highlight any areas of high brightness and drag the color levels to a shade that is lighter than the highlight. Decrease the level of transparency to a shade lighter than the highlights.
You can click on the options icon to change how the Levels perform.
To decrease the level of Transparency, choose “Maximize Transparency,” and then reduce the Transparency below 50%.
The steps are very easy. It is as simple as connecting the dots. The perfect levels could also be selected by double-clicking on any color or Transparency settings and clicking “Checksum” to see the exact values.
Tips to get the best results
Using Levels to improve photos is very simple and can be used at any time. But there is an important tip when it comes to using Levels in Photoshop. Always click on the photo before you drag the levels.
When Levels is dragged, it automatically applies the levels to your image, which will change the image’s look. If you select the photo and then drag the levels, the effect will not be achieved.
Tips to adjust levels in Adobe Photoshop
Never move the Levels unless you must – this is an irreversible change. Always select the photo in your working space before dragging the levels.
Adjusting Saturation and Hue
You can use the following settings to adjust saturation and hue on Adobe Photoshop:
Set saturation: set to ‘high’
Set hue to ‘medium’
Set black level to ‘high’
You may also use ‘custom saturation,’ if you prefer a custom setting. Set custom saturation to ‘high’ and click the OK button to save.
Blurring Your Photos with Smart Filters
After introducing smart filters in Adobe Photoshop CC 2018, Adobe is introducing these filter options to Adobe Photoshop CC 2021. In this guide, you’re going to learn how to Blur your photos using smart filters and their working with the Blur function on Photoshop CC 2021.
The Blur smart filter is a popular photo editing tool, which has great potential to bring some gorgeous effects to your photos. Use them to smooth out details on photos and give them a blurred look. Use the sharpening slider on your image to get a more defined photo. Now, select the Blur smart filter on the right side, and choose the Shrink or Threshold sliders. You can either choose one of these two options to apply blur to your photo or click on the Smart Arrange function to auto-stitch your photos together.
To apply the Blur smart filter to the photo, go to the Adjustment Brush, Adjustment Layer icon at the top, and click on the Smart Arrange.
CHAPTER 6
Adjusting Your Photo’s Color Intensity
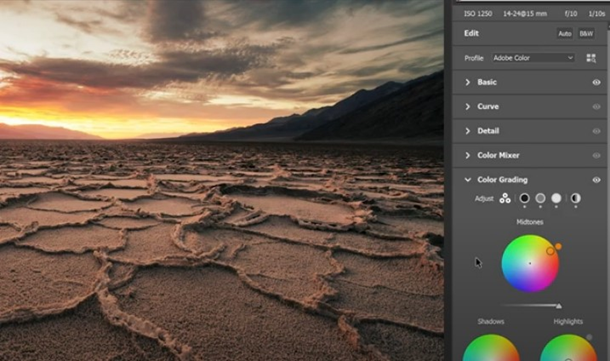
The RGB balance tool allows you to adjust the intensity of the color channel, so if you’re looking for a way to enhance colors in your image, I suggest you give it a try.
You can adjust the intensity of the color channel slider to see how you’ll get the result.
Step 1: Start by going to Edit > Adjustments > Colors. Then, go to the Adjustments > Layers panel and add a new layer and change its mode to Layer Blend Mode: Multiply (check the check box). Then, go to the Layers panel, and select the foreground color layer and change its mode to Color Balance.
Step 2: Select the third color channel (at the right). Then, hit Edit > Define Color Palette. On the Define Color Palette dialog box, make sure the cursor is over the Visual and Mask Options box, and make sure the color balance area is selected. Now, enter the following values in the following fields: 50% for the Red, 40% for the Green, 20% for the Blue, and 10% for the Blue and Magenta (remember, the 3rd color channel).
Step 3: Now, hit Apply and, once again, go back to the Layers panel.
Step 4: Repeat the process with the other color channel (at the right) and the second color channel (at the left).
Step 5: Hit Apply and then, once again, go back to the Layers panel.
Step 6: Adjust the Color Balance Adjustment settings until you get the desired effect.
Step 7: Go to Edit > Speeds and Settings > Add/Remove Speeds and Levels, and make sure that the Speed is at 100%. Then, go to Edit > Colors > Local Adjustments, and make sure that the color balance drop-down is on the Color Balance tab. Finally, click on Apply.
How To Bring Out Detail in A Photo by Sharpening
What is sharpening?
When you get a photo of a plate of food or someone’s smiling face, the un sharpness and pixilation of the pixels can ruin the photo’s ‘true tone.’ To bring out detail in an image, you need to crop out all the unwanted, distracting, and pixelated parts of the photo (the blemishes, stains, dust, and fingerprints). But remember, there are no photos without sharpening!
The first step is to adjust your image so that it’s at its lowest quality. There are many ways to do this, but I find that the straight and level razor edge (blue line) settings on Photoshop’s brush tool (dot), is a good starting point. The razor edge tool allows you to easily set this photo to its lowest setting for quick processing.
Now, you need to select the parts of the image you want to sharpen. With the picture selected, click on the sliders on the bottom right and the radial presets that correspond to the parts of the image you want to be sharpened.
How to sharpen a photo with sharpening on Adobe Photoshop
Step 1: Increase contrast
Turning the contrast slider up, lets you see more detail in the picture, without making the image appear muddy.
Step 2: Increase sharpness
As you increase the sharpness, you will notice more detail, but the original levels of color and contrast will remain.
Step 3: Increase contrast
The contrast boost is very subtle, but it does make a huge difference, making the image look more dynamic.
Step 4: Sharpen the image
Click on the areas you want to sharpen, and then click on the sharpening mask. Photoshop will automatically adjust your entire photo’s sharpness. The finished result looks great, and there is virtually no distortion
Saving Photo Project
First, to save the photo project you must make sure that the files are not already saved on your system. You must make sure you have the correct version of the software. Then you need to make sure that there are a couple of files on your desktop.
All you have to do is open the project in Windows Explorer, go to the library, and select the file that you want to save. Right-click and select Rename from the context menu. Rename the file to pdo.jpg and then save it.
Exporting Photos
One way to export your photos is to load your image into Photoshop and take a screenshot of it.
Another way is to load your image into Photoshop and press Ctrl+Shift+G, select all the photos, and click Export Photos from Gallery.
After the export is done, make sure that you pick the correct folder for storing your photos in the new place, for example, click on the Save button and that’s it.
You can download the image at the point where you want to export it from the internet or make a copy of the image at the time of importing it into Photoshop.
What Are Selections
Selections are tools that give you direct control over the selection process. Selection tools are available to all Photoshop users. The selection tools are available to every user when you create a new document. The selection tools allow you to create different types of selection, based on the types of objects that you select.
Control over the selection process allows you to create different types of selection, based on the types of objects that you select. You can select multiple objects by clicking and holding on to one of them until the tool’s line appears, then dragging that object onto the next object until the selection box fills.
You can select multiple objects by clicking and holding on to one of them until the tool’s line appears, then dragging that object onto the next object until the selection box fills.
The tools allow you to select a part of an object. The tool used for this is called the Rect tool. You can select the part of the object by clicking on a line of the object, then dragging the line up or down to select the part of the object. The selection tool can also be used for surrounding an object with a selection line.
The selection tool is also useful when you want to highlight an area of an object. Select the area of the object that you want to highlight with the Selection tool, and then click on the spacebar to toggle the option to “select all” ON and the selection tools ‘on and off.’
Select the area of the object that you want to highlight with the Selection tool, and then click on the spacebar to toggle the option to “select all” ON and the selection tools ‘on and off.’
If you want to define a selection with a specific focus, you can select a single area and then click on the pick tool with your mouse. Once you select the pick tool, you can define a selection by clicking and dragging it.
Simple Selection Tool on Adobe Photoshop
A simple selection tool is an additive operation in which one operation uses and another one removes an element from an object.
As simple as the word can be, but not as easy as it sounds. When making the selection, you should first check if the object has an edge, then the object must be cleared and lastly, the object must be adjusted so that it does not confuse your mind. The ‘Select Item’ Group option
It is said that creating and aligning objects in Photoshop is hard work. If you do not know how to create the object with an edge (check your Object Reference), how to align the object, and finally how to align the object with the object reference, then the small tools are great ways to solve your problems.
To align the object with the object reference, you need to create a select tool with:
Centered Selection Tool
Center Selection Tool
Modified Selection Tool
Resize Selection Tool
Move Selection Tool
Do the same with each of these items in your toolbox. And if you are not into using the simple selection tool, then you should get the Simple Selection Tool by drawing your path.
The old Command Palette Tool
The Command Palette tool allows you to select multiple objects from the same selection group. It has the same functionality as the layer, selection group, editing tool, and adjustment tool. It comes in handy when you require more space in your Selection group.
Combining Selections, How It’s Done
If you want to combine several selections, then the following command will do the job for you:
Go to the menu –> selection –> and select “combine selection.” In the dialog box that appears, choose the options “Pan on selected objects” and “Pan on selected background objects.” Now, your selection will be easily available, and you will be able to move the selection around.
Here is the result:
The combined selection is available on the upper-left side. You can now do something with it:
If you want to change the zoom level of the selection, you can do so by clicking on the “Zoom on” option. Now, the selected parts will be bigger, which makes it easier to compare with the background or objects.
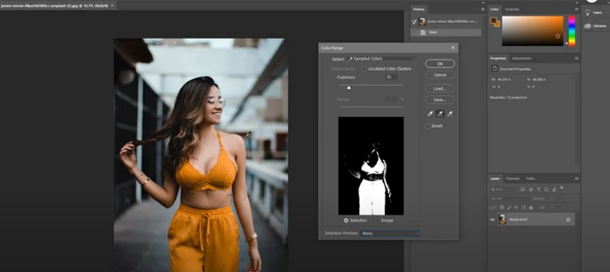
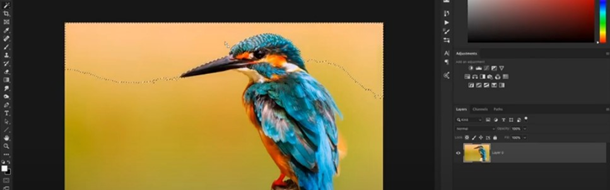
Selecting and Changing Some Part of Your Image
How do you choose the frame of a picture or video?
First, the frame of the picture should be free of lines or edges. Use the magic wand tool and draw a rectangle on the image. Then use the gradient tool and drag the edge of the rectangle a little bit to the left and a little bit to the right. This is how you choose the part of the image that you want to change.
How to choose an element of a photograph?
To select an element of a picture you can use the area selection tool or the clone stamp tool. Choose the element that you want to change and start clicking the area selection tool or the clone stamp tool. The tool can select that is the same size as the area you clicked.
How to change the color of a photo?
To change the color of a photo you can use the color brush or the color gradient tool. Click on the area where you want to change color, click on the gradient, and change the colors of the whole area. The tool will select, and the colors are displayed. The tool will select that is the same size as the area you clicked.
CHAPTER 7
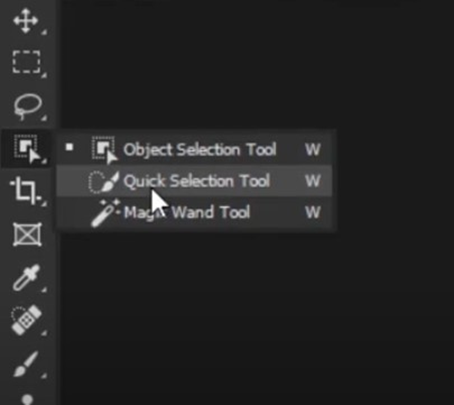
Using the Magic Wand Tool
This is an effect in Adobe Photoshop, it is used to create or change texture, opacity, or even cover parts of objects, or even change the color of objects.
It’s one of the useful tools that will help you with your job, this tool is available as a standard tool on Photoshop, but there’s a way to easily increase your working efficiency and make your work more efficient.
This is the way of using the magic wand tool in Adobe Photoshop 2021. A magic wand tool is an indispensable tool that allows you to edit the image creatively. Usually, the magic wand tool is used to change the composition of an image, to add texture or texture layers, to generate interesting illusions on the image, and much more.
How to Use the Magic Wand Tool in Adobe Photoshop Make a Big Carton
This is a simple method that takes a few seconds. Add a picture of a big carton and make sure you have the face upside down.
Fake a Surreal Effect
This effect is also used in advertising, music, and other art. This technique requires Adobe Photoshop to run.
Make a Cloud Effect
The clouds appear very surreal in this image, and you can create this effect with this simple method. Click on the Select and Copy button and copy the Clouds option. Then select the black and white option of the Painting tool and click on the name of the color you want to use. Open the painting tools again and click on the button to open the painting tools again. Once the process is finished, select the black and white option and make the clouds appear.
Blur the Textured Object
This is a very simple way to blur an object. Choose the Blur tool and choose a small point size and a smaller size of a selection area (or the larger one if you want to change the texture).
Create Light Spots
It makes the sunshine by selecting the Layers Tool and choosing Light and Shape. Then you must choose the Blue and Color Blur tools and blur the sun. This is a nice way of creating small sunlight.
Create an Effect Like the Sky
It looks like the sky is falling, but the illusion is more subtle than that. You can create the effect in this way. It is a bit time-consuming, but when you see the result, it is worth it.
Using Select and Mask Workspace to Clean Up A Selection
Probably the most important function of the Quick Selection tool is the ability to group, mask, and clean up selections. While there are some subtle differences in the way these functions work, there are a few simple steps to accomplish the same tasks. In this guide, I will go through the process of doing a mask, group, and cleanup on a clean-up selection.
Masking a Cleanup Selection
Let’s start with a clean-up selection. Select the area you want to do a mask on and go to Object> Mask> Make Selection.
After selecting the area, you want to mask, open the Masking options. Next, highlight the area you want to do the mask on. If you have a ton of fine details in the area, this can take some time to highlight. You can also color the mask to indicate its value. For the same effect, you can press Cmd + M to highlight the area for Mask. You can also color the mask yourself by pressing Cmd + G. After you have made your selection, you will be able to see the mask appear in your selection.
By pressing the Left arrow key while you are masking your selection, you can move the Mask value left or right. If you’re going to create a new mask for a new area, you can select and mask the area you want to add a mask on. The first time you do this, you will be presented with a few options.
Saving and Reusing Selections
Select the Graphic Icon, and you can save selection on the number pad.
Drag the right mouse button to the icon and type your selection number (this will not delete the previous selection) and click save.
How to Save Selection
Move your cursor to the toolbox and use the Control Key to move all buttons to the left. Now, type your selection number, and click Save.
How to reuse selection
Click on the bullet icon on the left sidebar of an editing session and it will bring up the Saved Sessions panel.
Go to the Saved Session tab and you will see a menu bar, click on the “Reuse Saved Sessions” icon and it will bring up a menu, then click “Open in a New Project” and a new window will open. Type in your name or project name in the box at the top of the window and click OK.
CHAPTER 8
Making Your First Layer Mask
Step 1 – Add Layer Mask
Open your Photoshop file. Once in the application’s menu, select New -> Layer Mask.
A new dialog box will appear. You can then decide which layers you want to work with and where you would like the mask to be applied. You can also use a color picker to pick a background color for your mask.
Step 2 – Find Your Objects to Use
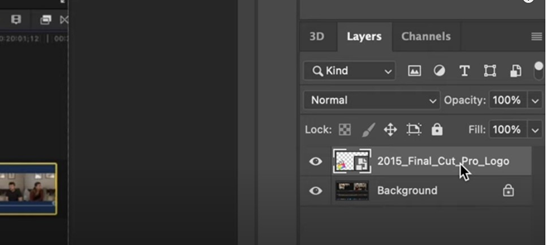
Start by finding an object you want to mask. Click on the logo that is open in the Photoshop document and start adding objects to the image that you would like to be masked. By default, the layer will be placed on the Logo layer.
Step 3 – Draw and Mask Your Layer
After you are finished adding the objects, make sure the layer is masked.
Click on the “Dashboard” and you should now have a new tool available called the “Layer Mask Tool.”
The first thing you need to do is find the image you want to mask. I found the image I want to use here. Once you find it, click on it. Then press Ctrl+A or click on “Objects” from the Toolbox menu. This will allow you to quickly select the image you want to be the Masked object.
Use the black and white shape tool to outline the Masked object. Click on the black object on the toolbar to enter the drawing mode and the white object to leave the drawing mode. You can use the Size and Position to place the outline and the Stroke tool to fill the outline with color.
The Masked Object will be placed on the Layer that was selected by the Layer Mask Tool. When you are finished, make sure the object is still visible in the Layer Mask Tool.
Step 4 – Add a Gradient Mask
Find the Gradient Tool on the Toolbar and click on the Gradient Fill Tool. Select a different gradient and start filling the Masked object with color. After filling in the object, click on the “Ok” button.
The Masked object is now filled with color, but it still shows a black outline. To fix this, we need to create a new Layer Mask.
When the mask is added, make sure that the layer is still visible. Click on the Gradient Mask Tool again and fill the Layer Mask with white color. Now, the black outline on the mask is gone.
Step 5 – Apply the Mask to the Layer
You can now apply the Layer Mask to the Layer you want to be the Masked object. To do so, go to Layer -> Adjustments -> Layer Mask. Select the mask you want to apply and click on the “Apply” button.
Once done, go to Filter -> Noise -> Ultra High Blur.
The layer is now blurred, but the masking is still visible, so take another look at the image. That’s it. You have now created your first layer mask in Photoshop.
How To Combine Images with Layer Mask
You first select the effect you want to combine or mask with the layer mask. You may drag the layer mask to the new layer you created, you can use the ‘Select All’ command.
You may drag the layer mask to the new layer you created, you can use the ‘Select All’ command. Then you start the Adjustment Brush and draw on the mask only some small amount of your image. The mask will appear right in the middle of your image. Now, it does not modify your image in any way. If it does, it is not obvious that it’s not any effect but a mask effect. And in the end, you may use the Rotate Tool or any other brush tools to reduce the thickness.
Using Selection and Layer Mask Together
- Selection and layer mask together
The selection tool can be combined with the layer mask to do some cool effects in Adobe Photoshop. Use the icon on the Layers panel to switch between the selection tool and the masking tool. A selection is good to use in case you want to remove something that’s not there.
- Brighter and warmer skin
Use the mask to a layer for better effect. To do this, first, make the selection on the layer with a selected area by clicking on it and then, drag the Select Filter Tool (Shift + Select) to a new layer. Repeat the same on the layer above by clicking on it and then, drag the Select Filter Tool (Shift + Select) to a new layer. 03. Smaller head & neck
This part may look the same as the one with selection and masking but, there are a few important points to make when using these two tools together. If you want to reduce the size of the head and neck you need to select the whole body and then, place the selection tool over the selected area of the body using the right-click menu.
- Shift Left/Right to get a better shape
If you want to get a more accurate shape you can do it by using the Shift Left and Shift Right Keys on your keyboard.
- Larger head and neck
The biggest advantage of layer masking is that you can go back to the original to change your mind about the shape you have created. To do this, select the selection layer and then, click on the layer mask.
- Crop and Shift Left/Right
You can also crop the image using a layer mask. Go to the Edit menu and then, go to the Select > Crop Tool. This way you can adjust the selection before it is masked. For example, you can crop the head or the face.
- Crop a bit more
You can do the same thing but this time, select the image and then, hold down the Shift key and click on the image.
- Adjust the head
Adjust the shape of the head using a layer mask.
- Decide on a different part
In the same way, you can remove the rest of the body or the head but, this time, you can also choose a different part of the body to keep, and this can be an eyebrow or an ear.
Fine-Tuning Layer Mask
What is a fine-tuning layer mask?
The fine-tuning layer mask is a mask that you can use for isolating pixels of a picture.
What are the types of masks?
Four types of masks can be used to isolate a certain area of the picture.
Key Frame Mask
Key Frame Mask is one of the easiest and popular masks that can be used in Adobe Photoshop. In this case, you need to apply one or two strokes in the mask with a default size and position. When you want to change the size or position of your keyframes, you can use a selection tool.
This mask allows you to isolate your keyframes of a picture from the background. It is very helpful if you have lots of artworks, which you want to export and reuse.
The same settings apply to this mask as for ‘keyframe mask’ but the key frame is more flexible. Here, you can select or erase the keyframe images by adjusting size and position.
Then you can select all the keyframes and export the image by using the same settings.
Miniature Mask
A miniature Mask is a mask that you can apply to an object such as people, animals, and textures. You can apply one or two small touches to the object and hide/show the areas. This method is very useful if you want to apply different textures to the texture layers and change the color of some of the details.
The key thing is you don’t need to select and erase the entire object to get this effect.
Glossy Mask
This mask is probably one of the most difficult to use masks to create. The trick is to select the areas of the image that you want to hide and then to add a small amount of light to the whole image. This will help in creating a dark glossy effect on your picture.
Once you have done this, it is very easy to add details to the glossy areas of your picture.
Highlights Mask
There are two types of highlights: masks you can use in Adobe Photoshop. One of them is a dynamic highlight mask that will apply luminosity to a part of an image, while the other one is a gradient highlight mask that will apply the shape to a part of the image.
CHAPTER 9
Adding Photos into A Composite

The next type of Photoshop layer is a “composite layer,” which can combine multiple photos into a single image. For example, you could add one photo into a container layer, and then modify that layer so that it overlaps with a photo layer.
Using composite layers can also let you manipulate and combine multiple photos into a single image, without having to re-paste the entire image each time.
But to add multiple photos together in composite, the last step is to merge the images. On the right-hand side of the tool’s palette, you’ll find a “Merge” tool. Drag it into the layers window and the selected layers (adding the photo layer first) will be merged. If you drag it into the image on the selection, the two layers will be merged.
How To Build Composite by Using Layer Mask
To begin with, you must open your document. You can use the button tool with Ctrl+A to open all layers.
After all, layers are open, you can use the tool Action Menu ( ⌘ -A). This will open the Action menu, which allows you to create a new layer from all layers.
Now, you must do a quick inspection of your image. It’s simple, you need to apply the “Elements” layer mask to the image. You will use a high contrast color mask with a black outline for doing this.
As you do this, you will see that the background layer has changed. Now, you can save your image as “composite1.png” and save it on the “Composite” folder.
Keep the “Image” layer active, and you can use the tool Action menu to create new composite layers.
Now, you can select the layer mask, which you used to create the composite by the layer mask. For doing this, you will use the “Opacity” layer mask, which can change the opacity of any layer. The maximum opacity of the opacity layer is 100. After adding the layer mask, you can apply the layer mask to the image. In this way, you can create a new composite. You can then save this new composite image as “composite2.png”
Do the same thing for the “Composite 3.png”. Keep the “Image” layer active, and we can create new composite layers.
To make a new composite, we need to save this image as “composite3.png” Keep the “Image” layer active, and we can create new composite layers.
Drop Mask: When using a drop-mask, you will see a thin mask in the top right corner. This tool can be used to create multiple composite layers from a single image.
Lasso Tool: Lasso will allow you to draw several contours from the top left corner to the top right corner. This tool will create one composite layer from many.
If you take a look at the action’s menu, you will see that we have to choose “Draw Mask,” If you have problems finding it, use “Horizontal Mask” to change the tool to the “Draw Mask.”
You can now create a composite from the 2 separate images.
It’s a good idea to leave the “composite” layer active. This way you can easily restore the “Image” layer whenever you need to add an image to composite with.
After the composite is created, click on the “Show Preview” button, and check the new composite. Now, to save the composite image, you can press the “save image.”
Using Smooth Transition to Combine Images
This technique is useful for people who want to quickly merge two images or use colors that they already have in their camera and prepare a composition on the same picture, quickly.
This technique is useful when you want to combine some textures or backgrounds in a way that the contrast is distributed in a non-confusing way. If you have a single image you want to combine, there are several ways you can do it:
One of the main challenges of this technique is that you need to go for the original picture (or, if you’re using an image that has been merged by the app Photosynth, you need to choose the file and import it into Photoshop) and then apply a Smooth transition layer mask so that you can add a blurred transition effect where the blurred part of the transition effect will cover up the original image.
This will let you do the same kind of blending on both images, only with a different source photo. To be able to do this, you need to find a magic radius of 45 pixels on your image. This magic radius will let you select a part of the picture (you will have to click the magic radius area to get more precision and results will be more precise) that needs to be hidden, so the magic radius will bring you to the invisible part of the picture and then it will blend the normal photo with the blurred photo.
Using Blend Mode to Create Composite
Blend modes give you control over the blend of two or more colors, or one color and one or more shadows, highlights, or shades. You can turn them on or off to control what appears where and how.
When you don’t use them, you don’t get the options. When you do, you can adjust how subtle the colors or textures are and adjust the level of color and brightness.
Blend modes in Photoshop come in many varieties, but most of them let you use the color picker on your photographs to make selections. A few others let you choose the opacity and blending modes. Click on the Menu button in the upper left or go to File > Preferences > General.
Click on the “Blend Modes” option.
On the “Combine Presets” sub-menu, choose the settings you want for the foreground color and the foreground blend. Select “Blend with Complement” to blend the colors with color palettes if you’ve made them. If you want the colors to be invisible, you can choose “Preserve Mask” instead.
Click “OK” to save your settings.
When you’re done editing, you’ll need to pick your new blending mode when you make changes to your photos.
Multiple Blends
Find the colors you want for your foreground color and the foreground blend. Change them to “Normal,” which is the default.
To blend two foreground colors, drag them from the document onto your photo. You can do this either by clicking on them or by holding down Ctrl while dragging them.
Blend with Complement
Your foreground color and your foreground blend appear as a single color, which you can adjust. To start, click “Normal” and “Blend with Complement.”
With “Blend with Complement,” each color can be adjusted independently of the other. For example, if you set your foreground color to “Dark Gray” and your foreground blend to “Rich Light Green,” you can now adjust “Dark Gray” to “Medium Light Green.”
You can also start your blending at “Blend with Complement.” So, for example, you could increase the opacity of the Dark Gray color and decrease the opacity of the green color, without affecting the brightness.
Alternately, you can adjust both the foreground and background colors individually, which would combine their lightness and saturation, making the colors look more natural.
How To Match Colors in A Composite
There are lots of ways to pair colors with each other. This is probably one of the most popular but sometimes, it can be a pain to use! There are two easier ways to do it.
- Under the Combinations header, select a new layer
With the Combinations open, you can select a new layer and set the Shade
Group option to Light. Next, go to the Shade group option and select a
Shade hue from the palette to match the color of the bottom row of tiles in the background. Finally, set the Foreground and Background colors to your choice of primary, secondary, or tertiary colors to give your image a ‘balanced’ look.
- Use the Gradient tool with darker/light colors for balance
If you’d prefer, you can choose to have your tiles have a lighter/darker hue on each side of the tiles. Select the Gradient tool and select a gradient tool with a darker/light hue. Set the gradient slider to lighter/darker and press the Refine Edge button to apply the gradient. In the Workflow panel, select the drop-down option. Select Threshold and make the Gradient choice Bold. To make the colors even more balanced, select the Lightest/Darkest option.
CHAPTER 10
Using Content Aware Tool to Remove Objects

To remove objects from your photo/video, Adobe Photoshop now has a tool that helps you to remove an object from your photos and video. It can replace with a blur.
You will find this tool inside the settings > Content-Aware Blur in Photoshop CC 2021.
If you want to know how to remove an object from a photo, tap on the “content aware blur” and then move the object to another part of the photo. And you will find that the “object” has disappeared.
Using Spot Healing to Clean Up Imperfection
Cleaning up blemishes, rough edges, and fine lines can be a pain. There are many ways to go about it in photo editing programs like Adobe Photoshop. One of the simpler methods that you might want to try is to use spot healing.
But first, the steps to follow should be easy, which are as follows:
STEP 1
Firstly, it must be noted that you should not directly reduce the size of the object you want to add spot healing into. The exact method is that the spotlight ray must move from the point on the object to the center. But always be careful when playing with such a step, as reducing the size can cause the Spot ray to move in a direction that can damage the object.
STEP 2
While the pattern remains fixed on the object, you can use the hit and hold of your left and right mouse buttons to select the spotlight ray. The source of the hit is the object you want to erase, while the destination is the opposite side of the target object.
STEP 3
To get rid of the spot, click on the spot you want to target.
After a brief pause, the spotlight ray has moved to the target object and erased the blemish.
Erasing Little and Large Objects
With the new AI-powered Magic Image Eraser tool, you can easily erase portions of your image. Once the tool is open, you will have the chance to grab a digital document and follow the steps to begin your creative reshaping.
The Magic Image Eraser is straightforward, even for the most skilled digital image manipulators. Hit the “Erase” button and then select an area of your picture that you would like to erase. You’ll notice the action started from the moment you hit the “Erase” button. If you’re making a copy or pasting a photo, you’ll have to select a new area and then hit the “Erase” button again.
If you are working on an original picture and would like to make a copy of the same image, you can also click on the arrow that you see in the middle of the app window and then click the on “Create New Image” button. Once you have a new image, click on the arrow again to make a new copy of your original photo.
CHAPTER 11
Using Healing Brush Tool to Retouch Photos

Adobe Photoshop may not be as high-tech as the other Photoshop competitors, but it is certainly a favorite among photographers. Being a basic but highly capable photo editing software, it’s used daily by people from different professions and ages.
One of the benefits of using Photoshop is the wide range of tools that it offers, which makes retouching photos quite easy. For example, let’s say that you want to change a patch of yellowed skin on an image. All you need to do is go to the Erase tool, select the yellowed patch, and then click the ‘Go to Brush’ tools button. After that, select the healing brush tool and your job is done!
Another useful thing about using Photoshop is that you can retouch photos using a variety of techniques. For instance, you can bring back a person’s white hair.
How to use the healing brush tool in Adobe Photoshop
First, you must remember that you can bring back a person’s white hair if you select the necessary settings using the Healing Brush tool. Let’s look at how you do it.
The first step is to make sure that your Healing Brush tool is positioned at 100% opacity. Also, you can increase or decrease the speed.
Now, you should turn on the healing brush tool, so that you can edit an image using this tool. You can do this by selecting the Healing Brush Tool from the Tools menu. When you do that, the Healing Brush tool should be at 100%.
Let’s continue with the next step. To edit a patch of yellowed skin on the photo, you should place your cursor over it and click on the Start tool button. After that, click on the Healing Brush tool on the toolbar, so that you can select the Brush tool to retouch the yellowed patch.
To make sure that you are holding down the Ctrl key while you select the brush tool, you should release the Ctrl key first.
After that, you can control the brush as follows: either move the brush forward, backward, left, or right. You can also choose a destination for the eraser and a destination for the final stroke.
A good practice would be to keep the brush at a certain height and use an eraser to remove any yellow spots. For instance, if you want to delete the yellow spots, you should select the erase tool and press F6. You should follow the same steps, but do it from a different point, like a corner of the yellowed skin.
To add a final touch, you can use a small round brush to add a touch of color. To do this, select the medium round brush, go to the Erase tool, click on the End tool button, and select the color.
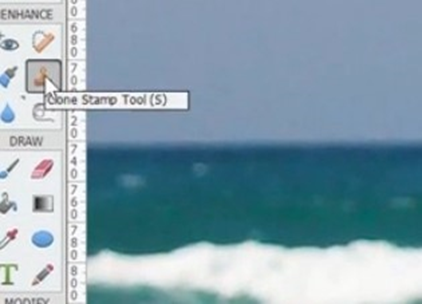
Using Clone Stamp Tool to Remove Object
First, let’s start with using the cloning stamp tool. To use the cloning stamp tool, it is required to move your mouse to a particular spot on the screen. From where you have inserted the mouse, click on Clone Stamp Tool to start working with this tool. Now, click on the specific object you want to cut, delete, or clone, and make it active by clicking on the + symbol.
When you start working with this tool, you will get the following options: Crop, Scale, Export, and Cut. You can use the tools available to you as per your need.
Using Patch Tool to Hide Unwanted Content
You can hide unwanted content from Adobe Photoshop by going to File > Preferences > Apply menu by pressing CTRL+Shift+J and choose “Hide unwanted content.” To get started, locate unwanted content in your Photoshop Files (file viewer), then choose the Patch tool from the dropdown list. The File > Preferences > Apply menu should have now changed to “Hide unwanted content.”
The patch tool is powerful and can do a lot more than hiding unwanted objects. In my practice, you can use it to hide and show typefaces, change text, choose/modify colors, add transparency, as well as many other useful features. You can also use the tool to disable unwanted toolbars, hide bullets, or modify layout properties.
Useful Features of the Patch Tool
1. Change Text Opacity
You can change the opacity of any text. To change the opacity of text, select it in the creative panel and press ALT+P, you will be presented with the new options to change the transparency of the text.
2. Change Typeface Opacity
Changing the typeface’s opacity can be useful if you want to use an older style of typeface in your illustration. You can either use a regular text typeface or you can use a sans-serif text, change the opacity to change the effect the font has on your artwork.
By default, the patch tool will hide all files on the creative panel, but you can hide files that you have selected by pressing CTRL+J to show the file viewer. 4. Hide Bullet
3. Hide Files
Hiding the bullet will hide the bullet button and the visible portions of the tool. You can choose to show a small chunk of the tool, a big chunk of the tool, or nothing at all.
5. Hide Bullet Buttons
Hiding the “More” button will hide the corresponding button in the creative panel.
CHAPTER 12
How to Reveal The Detail Of A Dark Photo By Shining Light On It
Step 1: Select your background to be darker by using the brush tool. Move it a bit, but do not exaggerate its shape as you want to use a solid, uniform background. When your background is darker, place a black circle in the left corner.
Step 2: Remove the black circle from the picture with the Rectangle Tool (M) and start painting a light line on top. Choose a darker color and apply a soft filter. Move the filter to the top right corner, making sure the camera is turned upside down. Now you can delete the black circle.
Step 3: You can also add a transparent circle as well, to create a sort of an artificial sun effect, but that’s optional. Then, proceed with the layer effects.
Step 4: Select the black circle layer and rename it too Unfiltered. With the help of the Brush tool, erase a bit of the gradient. Increase the opacity and slowly begin blending it.
Step 5: The next layer you need to create is the text layer. Using the Pen Tool (P), create the word “Calm.” Move the Pen Tool in circles as you would with a brush. Gradually go to a darker color, and later, slightly increase the opacity of the color.
Step 6: With the help of the Filter, create the Subtract tool, and apply a Soft Cut filter. Now that you have an outline, add the shadow area.
Step 7: After that, apply the Distort effect and slightly increase the opacity, to cover the dark area. Repeat that process for the dark area, and then create the bevel in the center.
Step 8: You’re almost done! And this is what you’ll see on the canvas. Click the green rectangle on the upper right corner to reveal the layers.
Step 9: In the submenu of Layers, select Layer Effects. And then, go to the right side of the Layers and select Filters > Advanced > Dusting.
Step 10: With the help of the same filter, you can create a similar effect. This time, while decreasing the transparency of the dust particles, go to the shadows in the layer mask and paint them with white color. Use a slightly different color than the one in the layer mask. This will make them look like specks of dust. And then make them blur slightly.
Step 11: As an authoring shortcut, select Filters > Effects > Reflect and create a filter with that effect. Now it’s time to edit the original background photo.
Step 12: First, you must select the green rectangle layer with the same name as the black circle layer. Then go to the Filter menu and select Black and White > Opacity. You can also use the Blur and Heal filters if you have them. Adjust the Opacity and, with the help of a soft brush, erase some of the shadows from the dark area.
Step 13: Now, go to the Adjustment Layer > Divide tool, and reduce the contrast by 40%. Then go to the Filter menu and select Clone Fill, which allows you to hide the layer you’ve selected. This way, you can create the effect that all the dust particles belong to a single layer.
Step 14: Now, go to the effect menu and select Fill Overlay. There, you’ll be presented with two options: Box and Multiply. Pick the first one, then use the Clipping Mask tool to mask the dust particles with the white area.
Step 15: Once you’re done, select the Text layer and give the image a title. And the last thing you need to do is save the image.
How To Remove Large Object from A Photo?
Step 1: Upload the original image that we want to remove the object and make sure that you’ve not removed any part of the image.
Step 2: Click on the Insert button on the Layers panel to bring up the Layers panel.
Step 3: Drag and hold the object on the layer below the image you want to remove. Go to Filter>Reverse and click OK.
Step 4: Now, drag the object with its gradient to the second layer you’ve selected. Select the inner circle using the on/off slider in the Object Relief filter. Hit OK.
Step 5: Click the Play button on the Add Layer panel to show the output image.
Step 6: Repeat the same step by dragging and holding the object on the next layer below the original one.
Step 7: Repeat the same steps on the remaining layers to add the pattern to the image.
Step 8: Your image will have the relief pattern around the object and the remaining part of the image is still intact.
Creating Duotone Effect

Duotone image is a stunning technique created by mixing two or more colors. Photoshop is undoubtedly the best tool that you can use to create this type of image. Even if you have only two colors, you can achieve a duotone effect in Photoshop.
STEP 1. First, create a new document on Adobe Photoshop.
STEP 2. Using the clone brush, apply the selected color with light shade and dark shade on the selected layer.
STEP 3. Now, apply a stroke effect on this layer and add more color saturation.
STEP 4. On this layer, you will add one dot color with another color.
STEP 5. Click on the Adjustment Layer. It’s used to modify the adjustments of a layer on a single layer. Now, go to the Hue/Saturation adjustment and choose the sRGB color range. It’s the most used value in Photoshop.
STEP 6. Click on the Layer Mask and adjust the opacity to the maximum.
STEP 7. In the brush, fill the selected areas using a dark shade. You can use any color of your choice here.
STEP8. Now, desaturate the layer using the sRGB range.
STEP 9. Repeat the same process and again fill the selected areas with light shade and dark shade.
STEP 10. Apply the Opacity to the Layer Mask to the maximum and adjust the opacity to the range 50% to 75%.
STEP 11. Now, save this image as a PNG file. Next, duplicate this image and edit it. Duplicate the entire layer and keep duplicated layer on the top of the layer mask.
STEP 12. Adjust the Levels and Levels adjustment to the effect, so that the second image will have the same background and color.
STEP 13. Open the main image and set the new layer as your main image.
STEP 14. Now, duplicate the entire layer and keep the duplicate layer on the bottom of the layer mask.
STEP 15. On the Layer Mask layer, you will see that the copy layer has a copy shadow (a dark shade) over the copy layer.
STEP 16. Repeat the process and select the copy layer. Now, repeat the same process and apply the clone brush to the copy layer and duplicate it twice.
STEP 17. Finally, on the duplicate layer, fill it with black and remove the clone brush from it. Now, it’s the main image.
STEP 18. Save this image as a PNG file and go back to step 11 of the tutorial to complete the process.
TIP
Using the above techniques, you can create a stunning duotone image. You can create other color combinations as well. Even, you can set all the layers, which are not selected, as the background for the layer mask.
CHAPTER FOURTEEN RAW File, How to Open It
There are two ways to open a RAW file in Photoshop. The first is by clicking on the Open with the RAW button in the tool’s palette at the Lefthand side, as usual. Or you can open a RAW file with one of the following commands.
Once opened, Photoshop converts the image to JPEG. Adobe Camera Raw (CSR) will only handle the conversion if your camera supports it. This is the simplest way to open a RAW file.
- Open Adobe Camera Raw in a compatible camera, such as the Canon 5DMark IV or Nikon D5300.
- Open a JPEG-compatible RAW image.
- Select the RAW conversion from the menu, then click on the Save option.
Using The Clone Stamp Tool
Start the clone stamp tool on a layer and quickly press CTRL+L or your clone stamp tool keyboard shortcut. Once you have pressed the stamp, you will see an option to create a copy of the selected part of the layer. You can use the option and once you have finished creating a clone, you can remove the stamp by clicking on the Remove option in the dropdown menu.
To create a copy of the selected part of the layer, click on the cloned area at the top of the screen and you can then highlight the part you want to duplicate by using the highlight tools by right-clicking or the Option key.
Close the clone tool with the icon pointing to the spacebar on your keyboard. Once you are done with the duplication, you can remove the clone by pressing the Delete option in the dropdown menu.
To delete the clone, you must go to the Clone Stamps and select the one you want to delete from the dropdown menu. Once you are done deleting the clone, click on the Remove button in the dropdown menu.
To open the clone tool you created, highlight the area you want to duplicate and press the Ctrl+L or the cloned stamp key followed by the shortcut on your keyboard. Once you are done copying the selected area, you can delete it by pressing the Delete button in the dropdown menu.
Comparison Between Photoshop and Lightroom
The truth is that both Photoshop and Lightroom are great photo editors. They have many different tools and power available for users to use and develop their specific looks. They both offer the capability to change colors and save as 4k images. Both programs have some settings that are somewhat unique and specialized. Lightroom has made some great progress by adding a range of controls, which help make it much more flexible and usable for people with unique photographic needs. Even though they both are very powerful and useful tools, I think that each of them has strengths and weaknesses that can be used to their advantage or disadvantage. The similarities in their interfaces make them easy to learn and they also offer a lot of free resources for learning the most basic features of Photoshop. This also makes it easy to move between programs and switch between them when needed. If you are looking for a basic photo editing program, then Photoshop is a great option. It is very flexible and has a lot of features. If you are looking for good photo editing software then Lightroom might be a better option, as it has a much wider range of advanced features. Lightroom makes it very easy to adjust colors and change their saturation, sharpen, remove noise, use filters, adjust focus and lens. However, if you are looking for a workflow or application to create a video trailer or project you might want to consider using Lightroom.
So, what is the difference between Lightroom and Photoshop?
- The Interface – Photoshop
Photoshop’s interface looks very different from other photo editing applications. The interface is very fluid and responsive, and the main window appears simple. The only tool you see at the first glance is the Crop Tool. Then you can also see the Toolbox Icon and the Display Palette.
Lightroom’s interface looks very similar to Photoshop but has many similarities to Adobe’s Creative Cloud applications. It also has a simplified and fluid interface and has a wide range of tools. The primary window, the library, is accessible with a mouse or touch screen. It allows you to browse photos and preview them as you work on them. This is especially useful when you are working on large projects.
- Split Window – Lightroom
One of the unique features in Lightroom is the split-window, which helps you to work more quickly. You can drag a button that works as a split window onto any part of the screen, and it will automatically open up a small side-panel where you can open and close filters. For example, you can drag the Faintness and Sharpness filters to the left side panel, and you can also select a few different parameters for each of them. You can also create new filters and apply them to the image. To switch between modes, use the scroll wheel on the left side of the interface or press the Q key.
If you have a keyboard on your keyboard, the split-window button should be the Ctrl + T combination.
- Effects – Lightroom
Photoshop doesn’t have many special effects to help you do your work, but it does have the Paint shop Plus Plugin. Paint shop Plus is an incredibly powerful editing plugin. If you want to do some very advanced color corrections with ease, you might want to consider using it.
If you don’t have plugins, the effects available in Photoshop are limited. For example, you can select the Linear Light and Gaussian Blur tools from the Tools palette, apply the effect to an image or make use of the healing brush.
Lightroom, on the other hand, has a huge number of filters. There is no limit to the number of filters you can create, add, and use in your project.
- Crop Tool – Photoshop
The crop tool can be found on the left-hand side of Photoshop’s interface. Using this tool, you can rotate, skew, crop, and zoom the image and its content to a different size. In the latter case, the image will be resized or sized down in the resulting image. A crop tool is a versatile tool in Photoshop, allowing you to accomplish multiple tasks at once.
In Lightroom, the crop tool is positioned next to the Transpose Tool, which also has many of the same functions as the crop tool, such as zooming and rotating, as well as zooming and rotating the image to different aspects ratios.
There are two sub-categories of crops in Photoshop: crop, which is the primary crop tool and rotated and skew, and scale, which can be used to select the location and size of the crop. The amount of magnification can also be adjusted with these tools.
A disadvantage of Photoshop’s crop tool is that the whole crop is visible to the user and the size and location of the crop can be modified.
In Lightroom, the crop tool and the scale tool are hidden, so you can’t see the entire crop area unless you change the mode to show.
- Kinematic – Photoshop
Kinematic is a unique technology used in Photoshop. It is a tool that uses special properties of the camera to automatically adjust the image to the distance between the camera and the scene. In a nutshell, it can automatically tweak a shot to match the amount of depth of field and that results in sharp focus and good image quality.
After the photo has been shot, the software must consider those variables and apply them to the image to recreate a proper depth of field. Kinematic does the math for you, so you don’t have to mess around with metering, focus, and exposure.
- Photo merge – Photoshop
Photo merge is another special function in Photoshop. Photo merge is a tool used to merge two or more photographs to achieve the illusion of multiple exposures. After the photo has been shot, Photo merge can automatically create a new photo by merging the two photos that are inserted.
In Lightroom, the Photo merge tool is positioned on the right-hand side of the editing interface. You can choose to edit only one photo or multiple photos. Photo merge is useful in a lot of different situations, but it doesn’t perform nearly as well as Lightroom’s basic Compose Tool. The lens that is used for shooting the image and the distance between the camera and the scene should also be specified.
- Edit Profile – Photoshop
This feature in Photoshop allows you to improve the sharpness of an image and to make the colors brighter and more vibrant. In Lightroom, the profile tool is positioned in the Layers tab. It does the exact things, but the tool’s appearance is quite different.
CONCLUSION
The Adobe Photoshop 2021 is a great tool for editing and designing photos, it comes with so many tools that will give your photo a whole different look, At the beginning of this book we told you some of the things to expect from this book like how to use the creative cloud, how to adjust the quality of an image, how to export photos and so much more. With this guide, you have been able to navigate through Adobe Photoshop 2021 with ease, but one important thing users should take note of is that when you are erasing a little or large object, make sure that you copy and paste the same image file that you used for the original photo. If you make a copy and then accidentally make a copy and paste the same image, you might find yourself having to take several steps back to get rid of your mistake.


Good work